Overview
Implementing Primero in a way that best fits your specific needs is a process that consists of five steps: Analyze, Plan, Configure, Verify, and Rollout.

Analyze
Analysis is the beginning of your configuration process and where you examine how Primero can be adjusted to meet the exact needs faced by your and other organizations in the area of interest. Primero can be modified to meet these needs through a number of variables: Forms, Lookups, Locations, Agencies, Agencies, Roles, User Groups, Reports, Programs, Modules, Contact Information, and System Settings. While all these elements of Primero are important, for many, adjusting them is a simple matter of entering readily-available information that does not require intense examination. Creating Agencies, for instance, will be a simple act of entering information for those organizations currently operating in the area of interest; no real examination aside from writing up a basic list is needed to accomplish this. The variables that require serious analysis, on the other hand--and thus the most important for us to mention here--are Forms, Lookups, and Roles. For each one of these variables, you will need to look at the goals your configuration hopes to achieve, the sort of information you want to be able to capture, and how different actors in the various organizations on the ground will be interacting.
Dos and Don’ts:
It is important to note that while most of the variables we have mentioned are easy enough to manage through Primero’s user interface, Locations present a challenge due to the simple issue of how many there usually are for a single implementation. Considering the difficulty of hand-entering the names of thousands of villages, cities, and districts into Primero, the best option for creating a full set of locations is to contact Primero IT Support, who will be able to automate the process for you. In other words, DON’T attempt to add a large number of locations manually. DO contact Primero IT Support to help you with the process.
The first of the above variables you will want to consider is the Role, and depending on how you configure Roles, the Users you create later on will quickly fall into place.
Users are not handled by the configuration bundle; see the Primero Administration and Configuration Guide
After all, a User is only as good as its Role, which allows it to view and edit information. When you do consider your Roles, you must think of the interactions that take place on a daily basis between actors. What types of workers are there in the various organizations on the ground? What is their organizational structure? Who is privy to what information? How do they exchange information, and who needs to give approval before this kind of exchange can take place? If the organizations you find have radically different structures, what commonalities do they have in their operations, and how can a set of roles be created that facilitates interactions based on those commonalities?
The second variable you will want to consider is the Form. Here, you will consider what kinds of information you need to be collecting. Primero comes with a set of default Forms, and these will provide you with a base from which to build out your own. Once again, you will need to ask yourself a number of questions about what sort of information you want to be gathering. The answer to each will have consequences for how you plan out your Forms. Who do you want to be able to see the information? If you want to keep certain people from viewing the response to a question, then you may want to keep a field in its own Form Section that only certain roles have access to. Will interviewees need to convey a complex answer the details of which are highly important? Then perhaps you should have a textarea field to capture these details. Do you want to be able to view aggregated responses to a question in a report? Then in this case a textarea is probably inappropriate, and you would do better to use a radio or drop down field, where the range of responses is limited to a set few.
Plan
Once you have an idea for what sorts of changes you want to make to the baseline configuration of Primero, it is usually a good idea to map out these changes to make them as comprehensible as possible. This way, while you are making changes, and afterwards, when you are trying to keep track of what changed and why, you have written documentation of everything you have done.
Generally, this is achievable through a series of spreadsheets. For tracking changes to forms, it is advisable to use a setup similar to the one below:
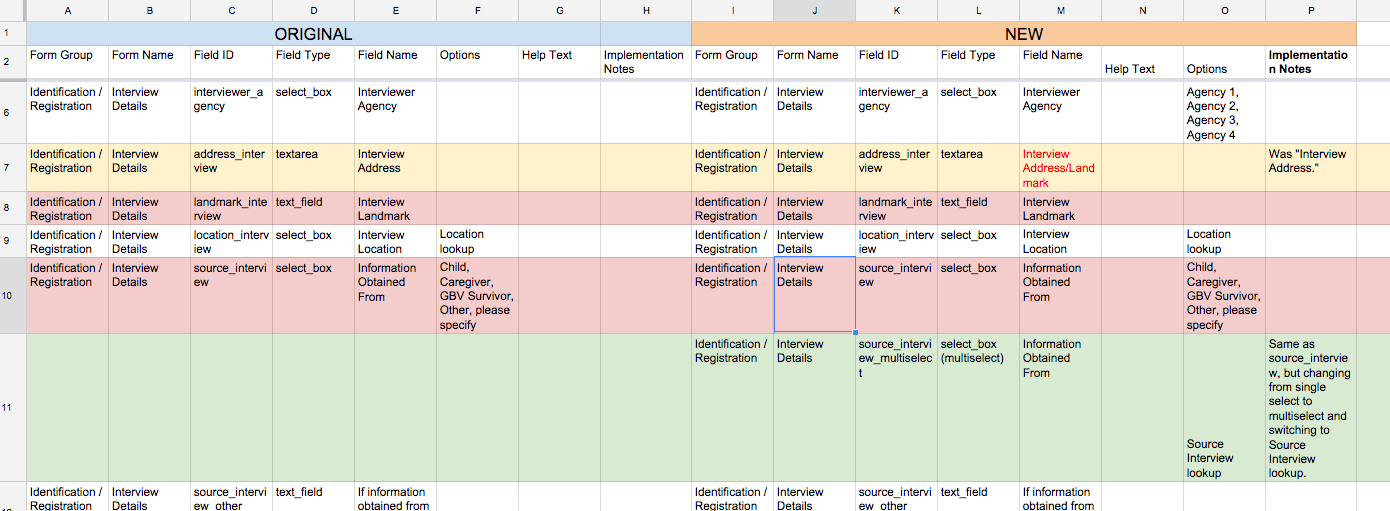
Here, you can see the page divided into “Original” and “New” sections. Each field, represented by a row, is is catalogued on each side of the spreadsheet as its own row. The columns are as follows: the form group and form in which the field belongs; the field’s ID, type, and name; any options to be used for radio buttons, check boxes, and drop downs; and a space for notes on why specific fields are outlined the way they are. When there are changes between the “Original” (left) and “New” (right) sides of the sheet, the row is highlighted yellow to reflect this, and any specific columns that have changed are marked with red text. Any deleted fields are highlighted red, and new fields are highlighted green. For organizational purposes, it helps to keep a separate sheet within the spreadsheet for each individual form section. For instance, in the spreadsheet above, the “Interview Details” form section has been given its own sheet within the forms spreadsheet. The “address_interviewer” field has had its name changed, so the entire row is highlighted in yellow, and the “Field Name” column in that row has red text. Meanwhile, the “landmark_interview” and “source_interview” fields have been deleted, and thus their rows are highlighted in red. Below these, there is a row for a new field, “source_interview_multiselect,” appropriately highlighted in green.
Dos and Don’ts:
An important thing to note here is the “Implementation Notes” column for the “source_interview_multiselect” field, which notes that the field is basically a copy of the deleted “source_interview” field above it, but with a new database name, and a multi-select drop down as its field type instead of single-select. The user has done this because it is highly inadvisable to change the field type of an existing field, especially if users have already saved data in the field. Instead, the user has created a new field with a new field ID that looks exactly the same as the old one, except for the fact that its field type has been changed to a multi-select dropdown. If you ever encounter a situation in which you want to change the type of a field, this is a good model to follow. In short, DON’T change the field type of an already-existing field. DO replace the old field by hiding or deleting it, and then creating a new field with a new database name and the new field type you want to use.
For Roles, it can be helpful to draw a simple organizational chart, and then create a more detailed map of each role you want to create by way of a spreadsheet. Since configuring roles also involves deciding which roles each role can manage, it may also be helpful to draw out an organizational tree, outlining which team members should be able to manage each other’s roles’ permissions. For a more detailed description of the permissions roles grant and the role management process, please consult the Primero Administration and Configuration Guide.
Configure
It is important to understand, before talking about configuration, that the Configure and Verify stages are part and parcel of a cycle you will go through each time you want to make a set of changes. The basic idea behind the Configure/Verify cycle is to make a few small changes to your configuration, check to see if those changes work, and then export a configuration bundle to save your work before moving on to the next set of changes. Moving in this iterative fashion lets you rewind changes easily in case you make an error.
Furthermore, this process should not be done on your main implementation. Instead, this should be done on a separate implementation hosted on a laptop which is not set up to automatically sync with any other instance. The Configure/Verify process is one that can be precarious due to how much is being changed at once. If something goes wrong in this process, you do not want it to be on an instance with real data and real work depending on it. Once you have a final configuration file that you know works, THEN AND ONLY THEN can you import it into your main instance, a process explained in the “Rollout” section below.
In keeping with the principle of leaving yourself a trail of configuration files to fall back on, the first thing you should do before you make any configuration changes at all is to export the original configuration bundle for your main instance (the one which you eventually want everyone to use), storing it, and then importing it into your test instance so that you do not accidentally lose configuration changes that had already been made to the main instance.
To do this, start off by following the steps for exporting a configuration bundle outlined here Once you have followed these steps, you should be left with a .zip file. Double-click on it. A window will pop up asking you for the password to decrypt your file.
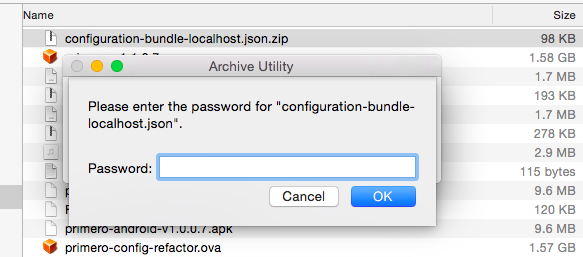
Enter the password and submit, and a new file, with a different extension, “.json,” will appear next to your .zip file.

This .json file is what you want to keep for later on. Once you have the json file for the export, save it to a new folder where you will keep all of your configuration files and name them clearly so you can find them later if necessary.

Now that you have this baseline configuration file saved away, make sure you import it into your test instance. Once again, this step is essential so that any changes you make are made specifically to the configuration as it currently stands on your main instance, and so that you do not accidentally erase any configuration changes that have already been made there. To import the config into your test instance, follow the steps for importing a configuration bundle located in the Primero Administration and Configuration Guide.
Once this is done, you can start making your first set of changes on the test instance. In general, your changes should be made in the following order: Lookups > Forms > Roles. The reason for this is a simple matter of dependency. Creating form fields often requires using lookups; creating a role involves deciding which forms the role will have access to. (You will also want to do this before creating user accounts, since creating a user requires assigning that user a role.) You can, of course, mix things up a little bit--for instance, creating a form field and its lookups at the same time--but sticking to this guideline will generally prevent you from trying to reference something you forgot to create in the first place.
For information on how to actually make particular changes in Primero, consult the Primero Administration and Configuration Guide. As a matter of practice, do not make too many changes at once; try creating a form and a few of its text fields, a multi-select field and its lookup, or a role and a user to which said role is assigned. Smaller sets of changes are easier to reverse, and when something goes wrong with such a small group, it is easier to tell what might have caused the error. Once you have made your changes, it is time to verify them.
Configuration Bundles
Configuration bundles allow you to export and import the configuration for a Primero instance. This allows you to basically duplicate the configuration of one instance and can greatly simplify the setup of a new instance: simply export the desired configuration from an existing instance and import it into the new. There are two types of bundles: a user bundle and a configuration bundle. The user bundle includes just the users and their corresponding information and the configuration bundle includes all other data in the system except for the record data itself.
A bundle import will preserve any existing data that isn’t part of the import, but will overwrite data that is part of the import. For example, if you had an agency IRC in an instance and then imported a configuration bundle with the agency Save the Children, you would have an instance with both of those agencies. If you had an existing agency Save the Children with a telephone of +1-555-555-5555 and the same agency in the bundle had a telephone of +1-444-444-4444, the latter phone number would exist in the system after a bundle import.
Import and Export Bundles
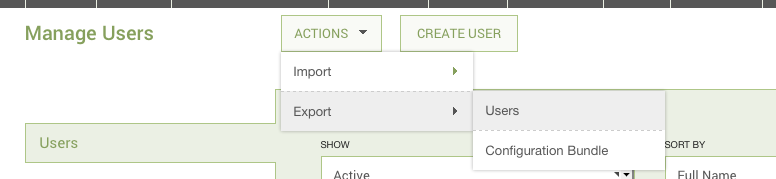
To do the import, login as the instance superuser and go to the Settings tab. Under the default subsection Users, you should see the Action button with the options to Export and Import. Once you’ve selected the desired option, you should see another option for either Users or the Configuration Bundle.
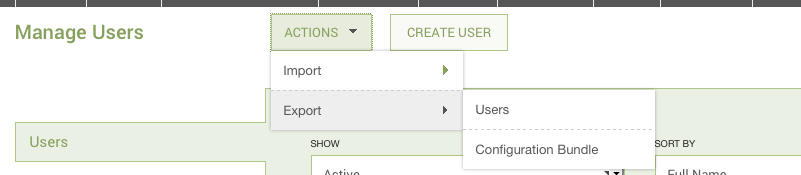
To export a bundle from an existing instance, click on Export > Configuration Bundle. You will then be presented with a popup window asking you for a password and an optional file name.
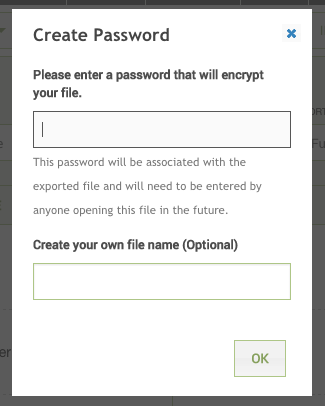
The first field is required, so choose a strong password that you can remember. The second field will name the file. After completing the password field, click on OK and you should receive a zip file containing the configuration bundle.
To import a bundle from another instance, click on Import > Configuration Bundle. It will ask you for a file that contains the bundle data.
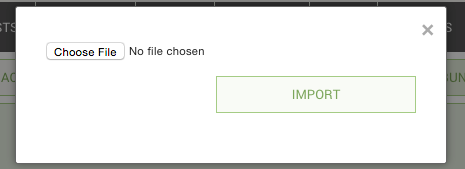
This is the .json file that was contained inside the zip file that you received when you exported the configuration bundle in the previous step. You cannot upload the zip file itself, however, since it is encrypted. Therefore, you must extract the file out of the zip file to a known location on your computer, and then find it and select it in the import popup window. To do this, double click the zip file, enter in the password for the exported file and your computer will open a .json file. Select this file for import. After clicking OK, the system will process for a moment and then present you with a message whether the import succeeded or failed.
User Import and Export
User import/export is a similar process, except that you use the Actions button to the left of the bundle import/export buttons and select the desired action. You must be on the Users page (left navigation) to see this option.
Unlike the import for the configuration bundle, the user import accepts the zip file; however, you must provide the password to it in the import prompt.
Troubleshooting
Incomplete configuration bundle import: Sometimes a bundle import will succeed, but not apply the full set of bundle changes. For example, some forms or lookups may go missing. If that is the case, the bundle will need to be reapplied again, until the full set of configuration changes are observed. It helps to keep a list of expected Forms, Lookups, and Roles and then double check that this list appears in the configured Primero instance. It is important to note that existing core case and incident data will not be erased if the bundle is partially applied.
Verify
The best way to verify your changes is to simply save a record. Either open a new record, or edit an existing one. From here, try to make changes to all the fields on your record. As you are going through the various form sections, also take a minute to make sure that the fields look the way you imagine they should look. When you click on a drop down, do the options you specified for that drop down appear?
Below is an example of simple steps that can help in this verification:
Navigate to the form/fields that were changed or added
Are they in the right location/group?
Are they the right type of field/form?
Are the labels correct?
If you have chosen to hide in view page, does it hide correctly?
Log in with any new roles you created or edited
Does the user have the proper access to records/resources/actions?
Does the user have the proper dashboard information?
Add similarly formatted test information into each of the new fields and forms and save (example: do not attempt to add “Old” in Age field, add the type of information the form is expecting)
Does it save properly?
When you navigate away from the form, then back, is any information lost?
Export the form/fields you created into Excel
- Did they show up in your export correctly?
When you are finally done adding information to your record, save it, and see if your information saved correctly. If they did, and you have encountered no errors, try creating and then exporting a report as well. If all of this proceeds without error, it is time to export a configuration bundle so you can save the changes you have made so far. To do this, follow the steps for exporting a configuration bundle outlined in the Primero Administration and Configuration Guide. Once you have followed these, you should be left with a .zip file. Double-click on it. A window will pop up asking you for the password to decrypt your file.

Enter the password and submit, and a new file, with a different extension, “.json,” will appear next to your .zip file.

Move this .json file to the folder where you are keeping your configuration files, and give it a name to distinguish it from the others, preferably with the current date and a counter included. If you make a lot of changes, seeing the date and and an order number on your files will help you to remember the order in which your configuration files were created, and thus the order in which your changes were made.
Once you have saved your new config file, you can move on to your next set of changes and repeat the Configure/Verify process.
Dealing with errors
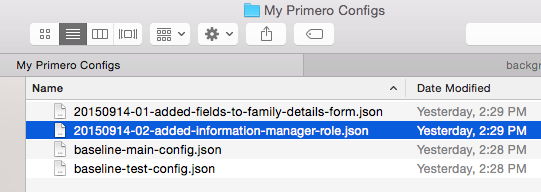
As you have seen from the ‘My Primero Configs’ folder, filled with configuration files above, this cycle of configuring, verifying and exporting will produce a list of changesets that will provide you with a sort of timeline to which you can fall back and perform a “do-over” when errors occur. If, for instance, after making the two sets of changes represented by the two configuration files in the ‘My Primero Configs’ folder, you made an error trying to make a third set of changes, you could simply go back to how your configuration looked after the second set. To do this, you would simply import “20150914-02-added-information-manager-role.json” back into Primero. For instructions on how to import a configuration bundle into Primero, please see the Primero Administration and Configuration Guide.
Rollout
Once you have configured and verified all of your changes successfully and then exported your final config file, it is time to move these changes over to your main instance. This should be done when no one is using the system. If the instance already has a number of users, be sure to communicate to all users that the system will be unavailable for use, and if possible, perform your rollout at a time when very few users would be using it anyway, such as the middle of the night. You will also want to allow yourself some buffer time after rollout to verify that everything is working, and if necessary, roll back your changes.
Dos and Don’ts:
In situations where numerous users have their own local instance, it will be tempting for them to create their own reports, user groups, or any other resources that are managed by the configuration bundle. The problem with this habit is that any changes users make on their own will be lost when new configuration bundles not containing those changes are sent out by high-level administrators. For instance, imagine that a user in a field office decides to create their own report tallying the number of cases between the ages of 15 and 18, and that every month, an administrator at the national level sends out a new configuration bundle containing changes to roles, user groups, etc. If the field office user imports the configuration bundle sent out by the administrator, and it does not contain the new 15-18 report, then the report will disappear from their instance. Therefore, if you are a high-level administrator overseeing configuration maintenance, DO make sure that other users have a means of sending you any configuration changes they want made so that you can distribute them in your configuration bundles. If you are a user who is not maintaining a deployment’s configuration bundles DO NOT make changes on your own without making sure they are part of the central configuration decision-making and distribution process.
The core of the process is actually as simple as it sounds: import the configuration file (using the steps outlined in the Primero Administration and Configuration Guide) and then verify that there are no errors editing and saving records. (Please note that it may take a few seconds for all your configuration changes to load once you have imported the configuration bundle. If you do not see your changes show up immediately, wait fifteen seconds or so, reload your page, and check again.) One practice that will help you contain the footprint of such a verification process is to keep two or three records which are to be used solely for verification and are very clearly marked as such. (Giving them names such as “Configuration Verification Record 1” should do the trick.) When you are verifying, edit only these records, so that you do not leave behind a clutter of unwanted, distracting verification data.
If you do encounter errors after importing the configuration bundle to your main, try importing earlier versions of the bundle. This may allow you to isolate which part of your configuration changes are causing the error. If you still experience errors after trying a few older configuration files, it is probably time to seek help from Primero IT Support (see below).
After you have confirmed that your new configuration bundle is functioning properly, it is time to distribute it to anyone running a local instance of Primero which is synced with your main instance. From your main instance, do one final configuration bundle export. When you have downloaded your .zip file, do not decrypt it. Instead, send this .zip file via email to whomever needs to import the file, this way, the information contained in the file is secure. When sending the password to decrypt the file to these same people, be sure to do it by a means other than email--text, instant message, phone call, etc. This will make it harder for the configuration bundle to be opened by someone other than its intended recipients. When everyone hosting a local instance has imported the new config bundle successfully, the process is complete.
Primero IT Support
Primero’s support process follows three basic levels. Level one is comprised of issues that can be solved by in-country personnel, such as an administrator at the national level. Lost passwords, for instance, can be easily solved by members of the in-country staff. Level two issues, on the other hand, require action by technical personnel who have access to the servers running the main instance of Primero. Level three, finally, consists of bugs: issues that require changing the actual Primero source code. Most issues you will face when making configuration changes will lie within the second level, and contacting Primero IT Support will allow technical personnel to work with you to solve your problem quickly.